Tuesday, February 19, 2019

Guide & Discussion on How to Equip a Red God of Earth (GoE) Partner in Brutal Age

Hi everyone! In this blog post I share a guide / discussion on the red God of Earth (GoE) Partner in Brutal Age following one of my clan mates asking me how I think he should be equipped.

While I have individual partner recommendations in another article on this blog, in reality, the best way is to equip partners based on your 4-partner team with which you fight other players, because the battle is decided on how well a combination you make rather than how well you individually equip partners.

So in this blog post I will discuss various options for red God of Earth (GoE) - his "base" picture below.


The red God of Earth (GoE) is mostly all about 1 specific skill. That's the only reason to use him. It's his 3rd skill called Summer Rage:

This skill is very nasty. It basically does not allow the enemies to use their best skills (the most powerful skills have high CD). Well, technically it delays them / resets them back to max CD. This means the enemy will not be able to hit really hard or to use some powerful ability.


So for me this means that red God of Earth is not a damage dealer, is not a "tough guy", but is a support partner! (some players build it as a damage dealer if they have a non-stun 4 partner team)

And as a support partner there are only 2 ways you can equip him:
  1. Go for maximum speed: this means using Cat pattern for +25% speed and/or Speed left hand equipment 30+ speed more. Plus if a Speed leader 19%+ more speed. Plus secondary speed buffs from equipment upgrades. If everything together that could make a speed rating of around 200! With such a high speed he can move roughly 2 times when others move 1 time. Now he would not do much damage but that's not his purpose. With such high speed he can do Summer Rage 2 times more often!
  2. Go for a hybrid mix: this means using a Saya pattern to get a 25% chance to stun the enemy and since he has 2 area skills there is a good chance to stun. This would naturally sacrifice speed, but is probably the best choice for a Stun-based team.
Since the above 2 patterns require 4 slots, that leaves the red God of Earth with 2 slots. Those 2 should be filled with either team supporting patterns such as giving more health, more resistance or more damage to the team or, if you see that your GoE is dying too fast, or if you don't have any good team gear then you could give him additional defense, Hippo health (probably the better option since he has a high base health) or resistance if many enemies use stun.

OTHER:

Saya GoE Video:

My clan mate [TRA]Irontooth just shared his GoE battle, so here is that video:
He is using Saya on his red GoE but he has both a green GoE leader who gives 33% speed to the team AND a green Dragonman who further boosts team speed.

Equipped GoE Example 1:

Here is an example from one of my clan mates of an equipped red God of Earth with 2 x Corsac in the last 2 slots to buff up the HIT rate with +20% increasing chances for skills to land on the enemy. Otherwise the partner is also given a lot of attack so it is a bit of a mixed situation. I would not go for this myself as it is trying to be everything rather than doing 1 thing really well.

Equipped GoE Example 2:

Here is another build with a lot more health and Thera pattern. I believe the thinking here is to protect the GoE from 1 enemy attack round so that he does not get stunned and can do the Summer Rage when his turn comes (as he has lower speed). I would much more prefer this version than the one above.

I could not really find an example of what I really would prefer so I will say it based on the above 2nd example:
  • Health 11640 + 15881 = 27521 is already very good. He might even get more if the team is wearing any Whale patterns. So that part is fine.
  • All that big +Attack should be moved into speed and/or defense and/or HIT. His purpose is not to dish out damage and anyways a half cooked thing is never good. If one wants a proper damage dealing then Saya is not what you would wear.
  • CR / CRD you don't need at all, so if you have a choice to get rid of them do that (if you have 2 of same equipment, one with CR / CRD and one without, use the one without).
  • RES / HIT are useful so another possibility instead of the Thera which will work only for 1 turn is to use 2 RES patterns to help him resist debuffs during the entire battle. But I do understand why the 1st turn is significant in this case.

Conclusion

So I hope this guide / discussion on the red God of Earth was useful. The main point is that I believe this is a support partner (although some use it as a damage dealer).

Please put your feedback / ideas in the comments below to help all Brutal Age players in sharing knowledge, but please keep it limited specifically to the red God of Earth as this blog post is about him.

Wednesday, September 12, 2018

HORDE is not just Color - There are different POWERS

Some Brutal Age players may think that Hordes are just different colors and are completely unaware that there are significant differences between them apart from color. So in this post I explain what they are:

Purple Horde

  • Horde Skill 1: Protection Blessing: Summons a (FREE) shield to protect a clan mate! This is an awesome skill. Each clan member can use it. However it lasts only around 10 minutes and has a cooldown of 12 hours. Still it is a really great power.
  • Horde Skill 2: Effective Help: Clan Help Effect +30%.

Red Horde

  • Skill 1: Burning Flame: Set fire to the enemy territory. While impressive this is not really a game changer - it mostly inhibits Outpost production and does some damage. Although it is very nice for clearing out areas of Outposts especially if they are not active players.
  • Skill 2: Training Speedup: Training Time -3%. Does not look like a lot but every little thing adds up.

Yellow / Orange Horde

  • Skill 1: Vicious Curse: Reduce target's defense by 5%.
  • Skill 2: Effective Training: Training Cost -8%. I think speeding up training is more useful than cost reduction, however, training high Tier troops does cost a lot so it is also useful.

Green Horde


  • Skill 1: Construction Speedup: Construction time is reduced by 5%.
  • Skill 2: Resource Sharing: Regularly collect the resources rewarded by nature.

Blue Horde

  • Skill 1: Effective Healing: Healing Cost -20%. This is especially helpful to a very active/aggressive player who heals often.
  • Skill 2: Research Speedup: Research Time reduced by 5%. Similar to construction benefit of the Green Horde but generally Research is more valuable. Especially for higher Power players.

In General

The Purple Horde's shield power is very nice. Unfortunately players often don't use it properly or don't use it at all. However this power is extremely irritating to attackers as literally any clan member can block an attack on his friend even if for a short time (but sufficient time to gets things in order).

Between Green and Blue Hordes I think Blue is better in both of it's powers. Research is more valuable than Construction.

Red and Orange are really specific and I can easily see players preferring other Horde powers.

What is your favorite horde in Brutal Age?

Saturday, July 28, 2018

Rewards per Level - Adventure Brutal Age

Here you can see exactly how much Soul and Experience you can get in different locations in Brutal Age's Adventure. As it is not always logical we can identify the best places for rewards.

Before the long list of references below I want to share an important suggestion / analysis: there are 2 locations which are the best to do from what I found out so far:
  • First is for maximum Soul income (only Soul) - for this it is best to do Difficult Forest 5-6 Deep which costs 4 energy. The reason for this is because you get more attacks due to the lower energy cost and the Soul yield is very high coming both from the run as well as the very good price for selling the war patterns.
  • Second is for a balance of Soul income and Experience for leveling up partners. For this I found the best to be the Purgatory 4-6 Deep which costs 5 energy. The energy cost is 1 higher or 25% higher but the experience gain is significantly higher as well as a higher chance to get 3 star partner drops sometimes. This is probably the best overall as it allows both getting good Soul income and helps with leveling up many partners to feed them into higher level partners.
OK, below I present the reference I have gathered and prepared for you for all locations:

Riverside

1-1 Periphery

  • Soul: 440
  • Experience: +355

1-3 North

  • Soul: 752
  • Experience: +576

War Pattern Soul amount for selling:

  • 594 Soul for a 2 star green Hippo pattern 

Plain

3-1 Periphery - Purgatory

  • Soul: 1296
  • Experience: +1485

3-2 South - Purgatory

  • Soul: 1404
  • Experience: +1485

3-4 West - Purgatory

  • Soul: 1602
  • Experience: +1485

3-5 East - Purgatory

  • Soul: 1701
  • Experience: +1485

3-6 Downslope - Purgatory

  • Soul: 1800
  • Experience: +1485

3-7 Center

  • Soul: 1666
  • Experience: +1485

War Pattern Soul amount for selling:

  • 843 Soul for a 3 star Wolf pattern 
  • 815 Soul for a 4 star Wolf pattern 

Other rewards include:

  • Partners example: 2 star Green Cobalt:

Ice Lake

4-2 South - Purgatory

  • Soul: 1620
  • Experience: +1980

4-3 North - Purgatory

  • Soul: 1740
  • Experience: +1980

4-4 West

  • Soul: 1416
  • Experience: +999

4-4 West - Purgatory

  • Soul: 1860
  • Experience: +1980

4-5 East

  • Soul: 1536
  • Experience: +1005

4-5 East - Purgatory

  • Soul: 1920
  • Experience: +1980

4-6 Deep

  • Soul: 1632
  • Experience: +1011

4-6 Deep - Purgatory

  • Soul: 1980
  • Experience: +1980

4-7 Center

  • Soul: 1924
  • Experience: +1098

War Pattern Soul amount for selling:

  • 1716 Soul for a 2 star Bull pattern 
  • 2057 Soul for a 2 star green Bull pattern 
  • 2204 Soul for a 4 star green Bull pattern 
  • Full run rewards picture example with 9 runs yielding 17820 Soul:
  • Here is another example also showing a Partner drop:

Forest

5-3 Forest North - Purgatory

  • Soul: 1551
  • Experience: +1650

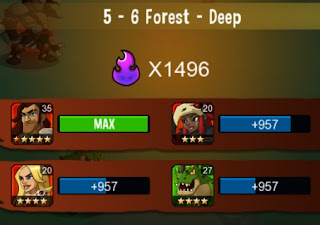
 5-6 Deep - Diff

  • Soul: 1496
  • Experience: +957

 5-7 Center - Diff

  • Soul: 1551
  • Experience: +1040

War Pattern Soul amount for selling:

  • 1871 Soul for a 3 star Badger pattern 
  • 1885 Soul for a 2 star Badger pattern 

Anc. Battlefield

6-1 Entrance - Normal

  • Soul: 960
  • Experience: +500

6-1 Entrance - Purgatory

  • Soul: 1290
  • Experience: +1500

6-2 South - Normal

  • Soul: 1000
  • Experience: +500

6-3 North - Normal

  • Soul: 1080
  • Experience: +510

6-4 West - Normal

  • Soul: 1130
  • Experience: +510

6-4 West - Purgatory

  • Soul: 1460
  • Experience: +1500

6-5 East - Normal

  • Soul: 1170
  • Experience: +510

6-5 East - Diff

  • Soul: 1210
  • Experience: +900

6-5 East - Purgatory

  • Soul: 1540
  • Experience: +1650

 6-6 Deep - Normal

  • Soul: 1210
  • Experience: +520

6-6 Deep - Diff

  • Soul: 1250
  • Experience: +900

6-6 Deep - Purgatory

  • Soul: 1630
  • Experience: +1650

6-7 Center

  • Soul: 1270
  • Experience: +760

6-7 Center - Purgatory

  • Soul: 1710
  • Experience: +1518

 War Pattern Soul amount for selling:

  • 808 Soul for a 3 star Cat pattern
  • 914 Soul for a 2 star Cat green pattern
  • 1019 Soul for a 4 star Cat pattern
  • 952 Soul for a 5 star Cat green pattern
  • Full run rewards picture example with 7 runs yielding 10220 Soul and a 3 star partner drop:

 Other rewards include:

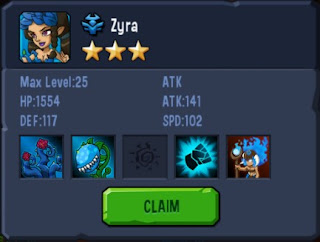
  • Partners example: 3 star Blue Zyra:
  • Partners example: 2 star blue Sis Violence:

Seaside

7-1 Periphery - Diff

  • Soul: 1200
  • Experience: +630

7-1 Periphery - Purgatory

  • Soul: 1560
  • Experience: +1800

7-2 Seaside South - Normal

  • Soul: 1260
  • Experience: +636

7-2 Seaside South - Diff

  • Soul: 1452
  • Experience: +1098

 7-2 Seaside South - Purgatory

  • Soul: 1620
  • Experience: +1980

7-3 Seaside North - Normal

  • Soul: 1320
  • Experience: +642

7-3 Seaside North - Diff

  • Soul: 1584
  • Experience: +1098


7-4 Seaside West - Normal

  • Soul: 1440
  • Experience: +648

7-4 Seaside West - Diff

  • Soul: 1680
  • Experience: +1098

 7-4 Seaside West - Purgatory

  • Soul: 1800
  • Experience: +1980

7-5 Seaside East - Normal

  • Soul: 1536
  • Experience: +654

7-5 Seaside East - Diff

  • Soul: 1752
  • Experience: +1110

7-5 East - Purgatory

  • Soul: 1860
  • Experience: +1980

7-6 Path - Normal

  • Soul: 1620
  • Experience: +660

7-6 Path - Diff

  • Soul: 1776
  • Experience: +1116

 7-6 Path - Purgatory

  • Soul: 2004
  • Experience: +1980

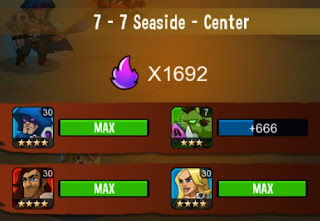
7-7 Center - Diff

  • Soul: 1692
  • Experience: +666

 7-7 Center - Purgatory

  • Soul: 2088
  • Experience: +1980

War Pattern Soul amount for selling:

  • 1019 Soul for a 4 star Corsac pattern 
  • 949 Soul for a 3 star Corsac pattern
  • 924 Soul for a 2 star blue Corsac pattern
  • Full run rewards picture example with 7 runs yielding 14028 Soul and a 2 star partner drop:

Other rewards include:

  • Partners example: 2 star Green Sis Violence:

Cave

8-1 Cave Entrance

  • Soul: 1296
  • Experience: +732

8-1 Cave Entrance - Diff

  • Soul: 1476
  • Experience: +1257

8-1 Cave Entrance - Purgatory

  • Soul: 1560
  • Experience: +1980

8-2 Cave Branch

  • Soul: 1368
  • Experience: +735

8-2 Cave Branch - Purgatory

  • Soul: 1620
  • Experience: +1980

8-3 Cave Path

  • Soul: 1440
  • Experience: +739

8-4 Cave Center

  • Soul: 1512
  • Experience: +742

8-4 Cave Center - Diff

  • Soul: 1644
  • Experience: +1267

8-5 Cave Narrow Path

  • Soul: 1584
  • Experience: +745

8-5 Cave Narrow Path - Diff

  • Soul: 1692
  • Experience: +1270

8-6 Cave Deep

  • Soul: 1632
  • Experience: +749

8-6 Cave Deep - Diff

  • Soul: 1740
  • Experience: +1273

8-6 Cave Center

  • Soul: 1680
  • Experience: +?

8-6 Cave Center - Diff

  • Soul: 1824
  • Experience: +1277

War Pattern Soul amount for selling:

  • 904 Soul for a 2 star Rabbit pattern
  • 1000 Soul for a 3 star Rabbit pattern 
  • 1019 Soul for a 4 star Rabbit pattern 

Other rewards include:

  • Partners example: 3 star Red Dragonman